 Click here to see this example >>> Click here for the style sheet >>>
This paper has already covered the basic building blocks of a CSS style sheet: selectors, declaration blocks, properties and values and shown how to apply these to the types of tag used in an XHTML document to gain control of the look of a document in someone else's browser window when they view it. The document has been created and structured in a semantically harmonious way with tags so that its structure has meaning to all manner of different devices that could access it. The CSS has enhanced the viewing experience for the most common type of access to a web document, the web browser, while retaining the structure and meaning of the docuement for devices that don't understand CSS and will ignore the style.css file. Now it is time to step up a gear with the on screen styling. Type selectors effect the whole group of tags in the document to give them a uniform look throughout. Other kinds of selectors can allow you control over the content of an individual tag.
Click here to see the example >>> Click here for the style sheet >>>
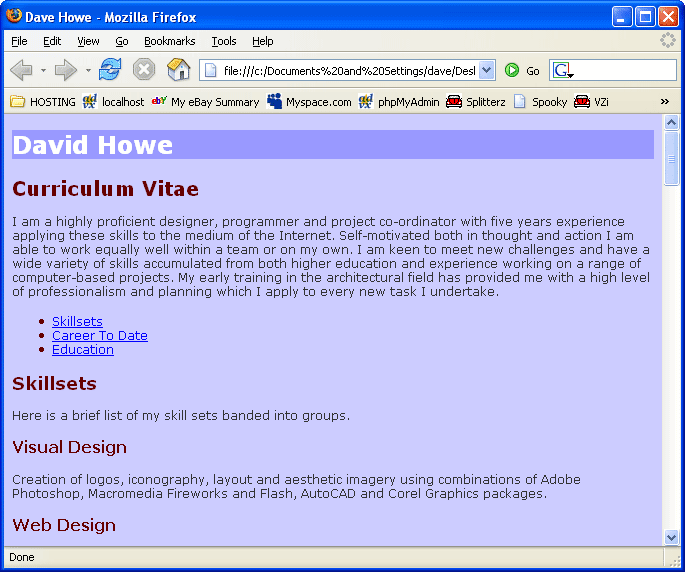
It makes sense to put relevant summay information about the subject matter on the front page of any web site. The example document, my CV, will be the home page of a website of information about me. Each page will contain some information about me whether its my CV, my interests or how to contact me. Web sites normally have a banner across the top with the name of the web site held in it on every page to give a common feel to the whole site. The <h1> main heading reads 'David Howe Curriculum Vitae'. Split this into two separate main <h1> headings, one with my name which will be the banner heading for the site and one for the heading of the page, Curriculum Vitae. Altering the XHTML in the index.html file as follows:
...</head> <body> <h1 id="pagebanner" >David Howe</h1> <h1>Curriculum Vitae</h1> <p>I am a highly proficient...
To differentiate the banner heading from a normal <h1> heading the unique id attribute has been added as it was for bookmark links to give the browser a flag to identify the individual tag with. The value can be pretty much anything but for good harmony and readable code stick to something obvious like 'pagebanner' and don't use spaces.
If you view the web document in a browser the only difference you will see is that the content of the two <h1> tags are now shown underneath one another. This is because the display CSS property in all browser default style sheets is set to block. This means that the tag pair and its content (collectively known as an HTML element) occupy their own space in the documentand anything that comes after it will start on a new line underneath the content of the tag rather than flow on next to it across the screen. This default behavious is very useful, you'll note that all the heading, list and paragraph tags have the same property which is why the structured text is so neatly laid out on the screen without having to code in anything to tell the browser that the next <p> tag starts on a new line. The fact that the code is laid out line by line is purely to make it easy to read for the person editing it, the XHTML document could be all on on line with the tags butted against each other or double or treble spaced, it would make no difference to the layout on the screen. The line breaks on the screen are solely down to the block value for the display property in all default style sheets.
Type selectors affect all the tags ina document of a type, althought one of the <h1> tags now has a unique id value it is still and <h1> tag and so is still the same size, font and colour as any other <h1> in the document and in terms of how a search engine or other device reads the content the importance as an <h1> tag for both the name and page heading are still equal. The id attribute of one specific <h1> tag allows the use of an ID selector in CSS that has a declaration block that only applys to the tag with the specific matching id value. Just as with the href attribute of an <a> tag an ID selector in CSS is preceded by a hash # symbol. Adding to the end of the style.css CSS sheet the style declaration block for css ID selector 'pagebanner'. Make the text white and larger and give the tag content its own background colour.
#pagebanner { background-color:#9999FF; color:#FFFFFF; font-size:24px; }
Click here to see this example >>> Click here for the style sheet >>>
The <h1> tag with the unique ID of pagebanner now acepts the settigns of color #660000 and font-family Verdana for the body tag that it is inside, the font-size of 20px from the type selector for h1 tags as it is of that type and then the final id selector settings, resetting the font size to 24px, the colour to #FFFFFF and a background colour to #9999FF. The settings from the parent tag's selectors and the tag's own type selectors cascade down through the document the ID selector gives final specific values for properties unque to the tag itself. at each hop along this path settings such as the color and font-size have been written and overwritten, the latter always taking precedence. Try to structure your CSS in the same way you structure your HTML and what may seem like a difficult task becomes a whole lot easier.
The addition of the specific background-color value to the <h1 id="pagebanner"></h1> tag illustrates the block display property of the <h1> tag in the default style sheet. The background stretches past the text across the full width of the page making a block of colour that shows the ares of the screen the block object ocupies. Now you can see why the content of the next tag starts underneath each time. Imagine the rectangular blocks around all the heading list and paragraph tags and you'll see how the page layout is built up.
The opposite to a block display type is the inline display type. This makes each item following an inline one shuffle up next to it on the screen.
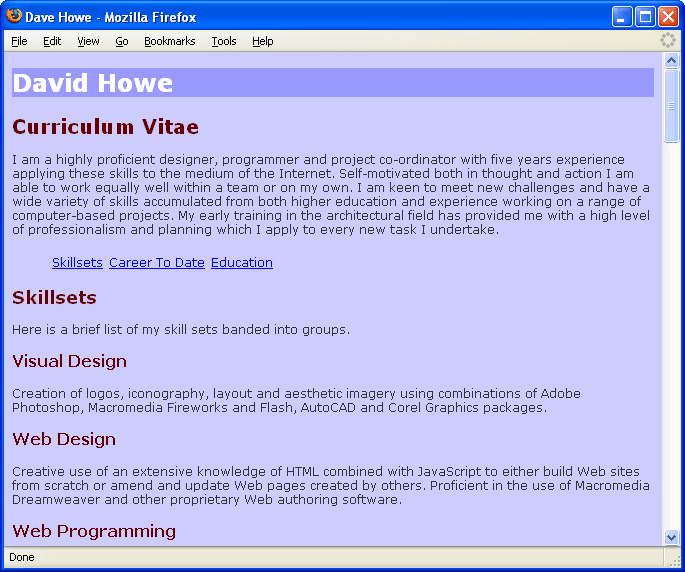
The contents list has three <li> list items that are by default block displayed elements. It is fairly simple to turn this vertical list into a horizontal link bar by making the list items display as inline rather than block items.
It would be simple to just add display : inline ; to the li selector's declaration block but at some future time there may be other pages with differnet lists that may want to display in the deault vertical manner. It is possible to give each of the three list items unique ID attribute values and set up three selectors for changing the default display to inline but this in a more complex page could prove very laborious when editing.
CSS provides a third kind of selector called a class selector. In addition to the id attribute, tags in an HTML document can all have a class attribute and the class attribute can be the same value for multiple elements. The class is a way of creating your own groups of tags beyond the prespecified type groups and id selectors.
The creation of a class selector requires both the addition of a value to the class="" attribute of several tags in the web document and the addition of the selector with the same matching name as the value in the class attributes of the tags it will apply to. Class selectors are distinguished from ID selectors in CSS by having a dot . preceding he class name instead of the hash symbol.
Add the class attribute with the value 'contentsitem' to the list item tags in the web document:
...task I undertake.</p> <ul> <li class="contentsitem"><a href="#skills">Skillsets</a></li> <li class="contentsitem"><a href="#career">Career To Date</a></li> <li class="contentsitem"><a href="#education">Education</a></li> </ul> <h2 id="skills">Skillsets</h2> <p>Here is a brief...
Create the class selector of the same name with a preceding dot and set the display property to inline to make the items with the class:
.contentsitem { display:inline; }
 Click here to see this example >>> Click here for the style sheet >>>
The links are all now shuffled up in a line next to each other (inline) but still within the block of their parent <ul> tag. This simple addition in itself shows the power and level of control that CSS gives you over the way a page looks. Historically there we all sorts of issues with the different ways the various web browsers such as Internet Explorer, Netscape, Mozilla etc displayed different aspects of the older style HTML web page coding. You should always check your page in the more common browsers to make sure it looks the same in all of them and if not , then at least looks acceptable.
The beauty of this highly structured and standardised approach is that it does away with many of the old browser difference nightmares that caused web authors issues for nearly a decade. Check the sample document in a variety of browsers and you will see the same layout in all of them. This is a virtue of the simple structure, browsers don't lose meaning in the interpretation of the code like they used to.
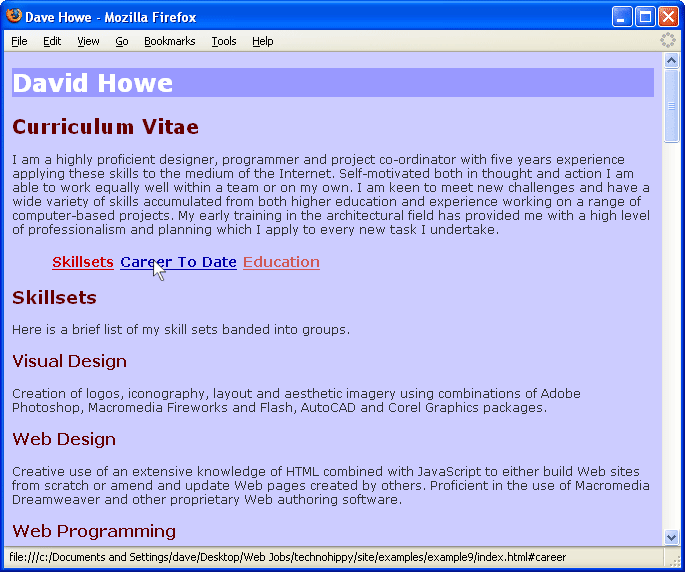
There is still one part of our document that is still using the default colours, the <a> tag. I have left this until last in this part of the paper as it is a jewel of CSS and it is good to end on a high note after so much trudging through code. The <a> tag is a bit special among tags as it represents an active part of the display that can be clicked to acheive something like sending the visitor to a specified destination. This gives the <a> tag 5 possible states or conditions to be in. You will already have seen that the blue colour of the links by default becomes purple once a link has been visited, these are two of the five states. CSS allows different declaration blocks for each of the five states using "pseudo-classes". The pseudo-class is separated from the type selector by a colon, the five selectors are described below:
The link state is the link before it's destination has been visited by the browser. By default this is blue and underlined.
The visited state is the link if it has been previously visited by the browser. By default this is purple and underlined.
The hover pseudo-class is an addition to the default style sheet and represents the state of a link when the user places the mouse pointer over the link (known as 'hovering over' the link). There is no default set so this state uses whichever visited or unvisited style is shown. This selector allows the link to highlight or change in some way when the user points to it with the cursor and enriches the viewing experience.
Once a link has been clicked there may be a short period of time between the link being clicked and the page changing in the browser. During this time the link is "active". The active state allows a further highlight (such as a colour change) to the link giving the end user visual confirmation that the link has been clicked.
If you open a web document in a browser and press the TAB key on your keyboard repeatedly you will see your browser probably draws a small ghost box highlight around each link and button. This is the focussed item. The focus state, like the hover state is another state available for giving visul feedback to the user by changing style to highlight the focussed state in some way.
First set some basic properties for the look of the <a> tag itself. There are a couple of new properties her too font-weight and text-decoration, both are fairly self explanatory as are the values bold and underline that go with them.
a { font-size:14px; font-weight:bold; text-decoration:underline; }
Then add in <a> tag type pseudo-class selectors for each of the five states
a:link { color:#CC0000; } a:visited { color:#CC5555; } a:hover { color:#0000AA; } a:active { color:#FFAA00; text-decoration:none; } a:focus { color:#0000AA; }
The a:hover and a:focus selectors are the same. If you want to give several selectors the same property the selectors can all precede the declartion block separated by commas. this can make editing CSS simpler in more complex web sites.
a:link { color:#CC0000; } a:visited { color:#CC5555; } a:hover, a:focus { color:#0000AA; } a:active { color:#FFAA00; text-decoration:none; }
 Click here to see this example >>> Click here for the style sheet >>>
The result is that the links are all a red colour, bold and underlined when fresh and unvisited and a paler colour once visited instead of the blue and purple defaults.
Place the mouse over one of the links and it will change to a navy blue colour while the mouse is over it (the hover state), move it away and it will return to its previous colour. The same happems if you press the tab key until the focus is on a link.
Click and hold the mouse button down on a link and the text will change to orange and the underline will disappear as text-decoration for the active state is set to none.
Click here to learn how to add pictures into your content >>>
